


Sure, you can go out and buy pricey gifts or elaborate table decorations for the holidays.
But nothing says “we care” quite as much as homemade items.
So put your hands together and get ready to see happy faces: make your own wreath, concoct a drink in a jar and give it as a gift, set a holiday-themed table. We’ve tested these ideas — they don’t take an awful lot of time, but they look impressive, and show you care enough to make it yourself.
And don’t forget the kids. They can make some of our suggestions, or they can cook to make gifts for teachers and friends.
“The homemade gifts stand out and sometimes we forget the simple things in life, like enjoying food,” said Chef Ashley Chen, who will teach an upcoming cooking class for 8- to 14-year-olds.
The class is 11 a.m.-1 p.m., Saturday, Dec. 10 at The Carriage House, 125 S. Arizona Ave. The cost is $40 a child. Included on the curriculum that day: candy cane white chocolate hearts, truffles and a cupcake in a mason jar. Who wouldn’t want one of those for a gift?
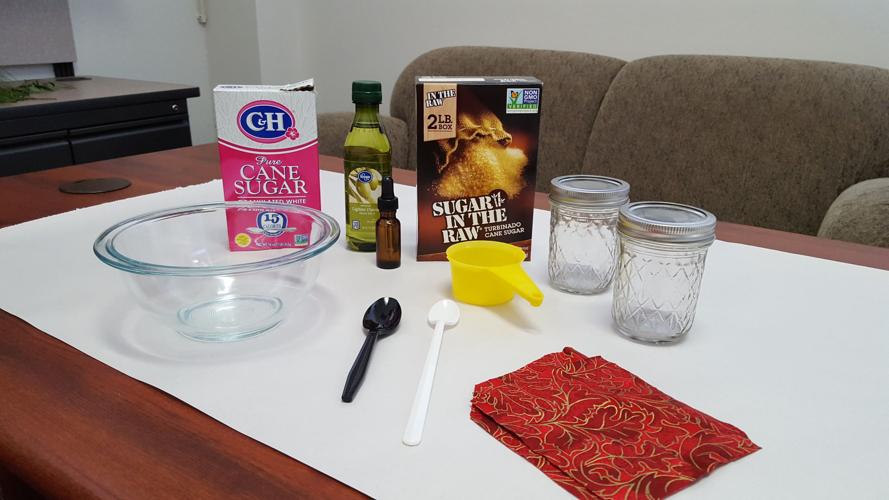
DIY gift ideas: sugar scrub
Sugar scrubs are simple to make. These can be used as party favors, gifts any time of year or even a fun activity to do with your girlfriends.
What you will need:
- ½ cup refined sugar
- ½ cup sugar in the raw
- Light olive oil
- Essential oil
- Bowl
- Spoon
- Mason jar with a lid
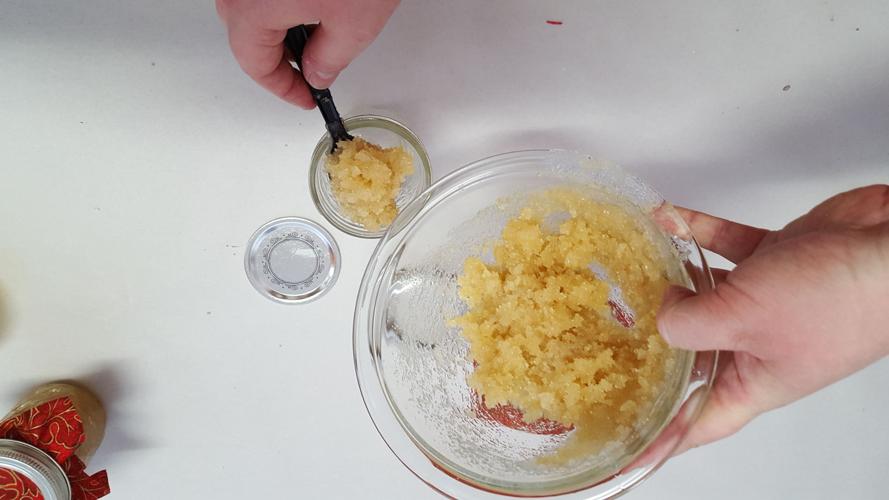
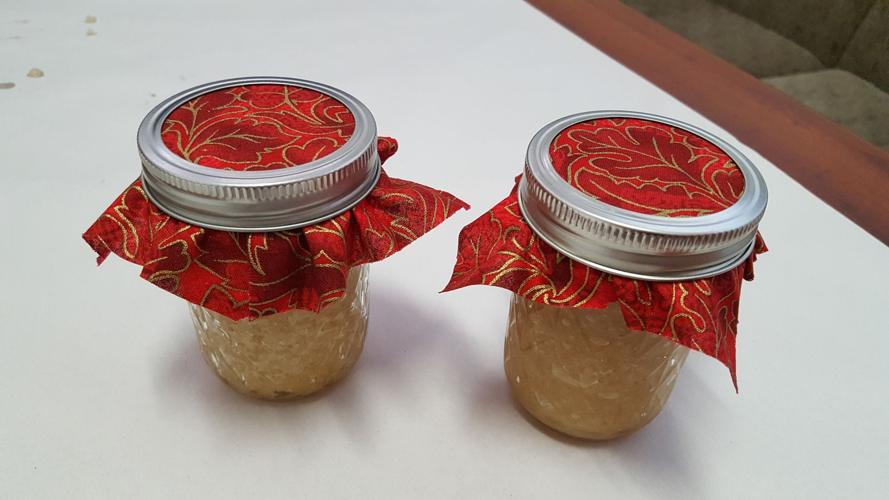
Mix refined sugar and sugar in the raw in a bowl. Add olive oil, stirring until sugar is moist. Add essential oil (you do not need to add this or you can add as little or as much as you like). Put sugar scrub in mason jar (you can use any container with a tight lid). You can cut a small square or circle of fabric to put on top of the lid then put the ring on. Sugar scrub is great for use on hands and feet.
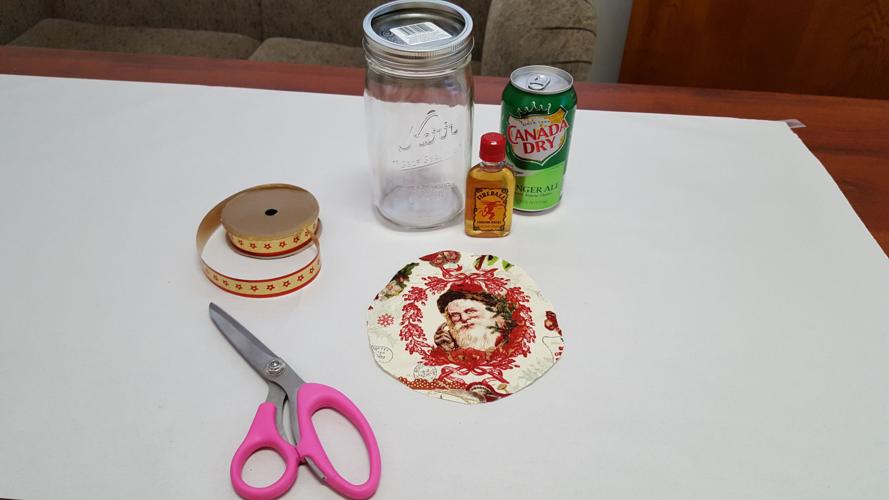
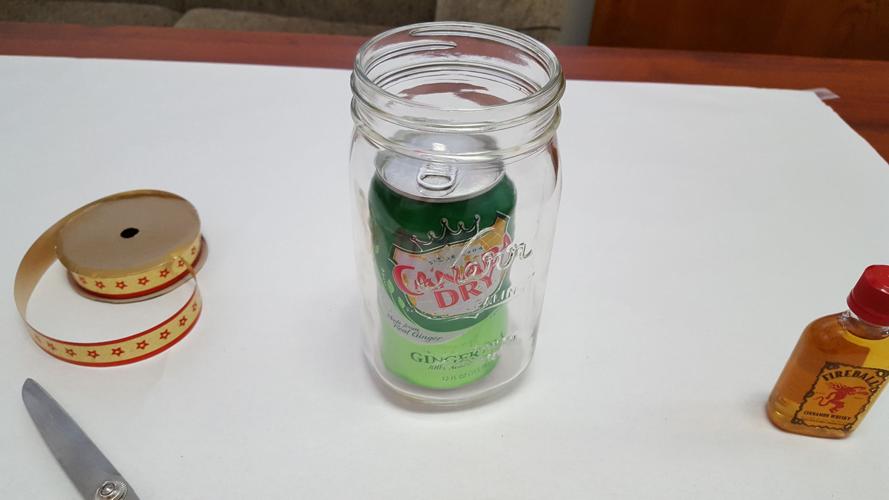
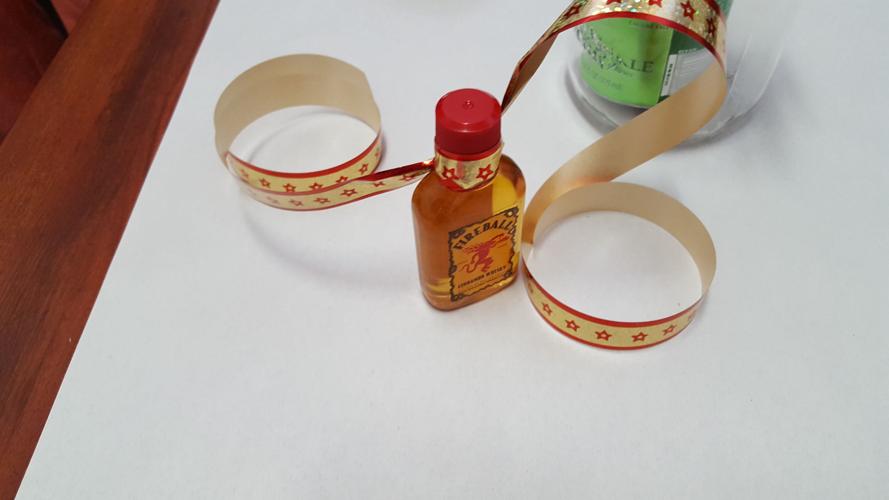
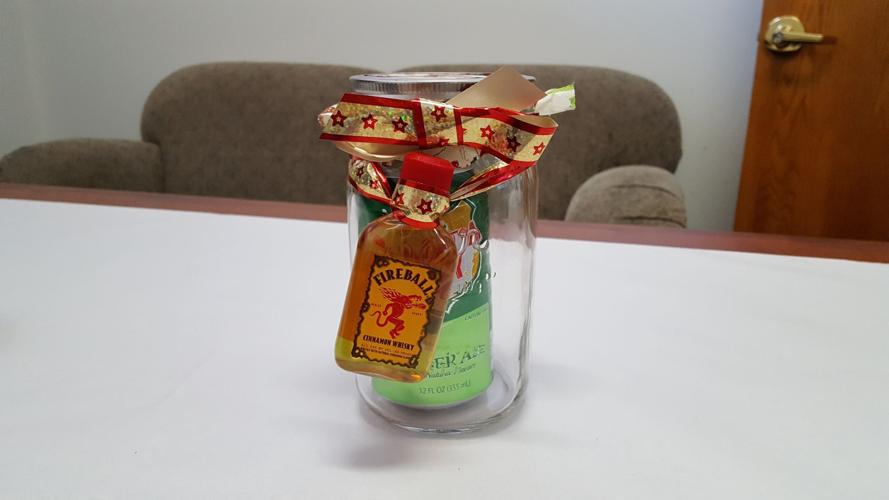
DIY gift ideas: drink in a jar: ginger ale and fireball
There are so many variations of this: Coke and mini rum, pineapple juice with Malibu rum, sprite with Smirnoff. You could even do 'mini bar in a jar.' Get a variety of mini alcohols and put them in a jar that will fit the bottles. You are only limited by your imagination and what you can find at the store.
What you will need:
- 24 ounce wide mouth mason jar with lid
- Ginger Ale
- Mini bottle of Fireball
- Ribbon
- Scissors
Put soda in mason jar (you can cut out a square or circle of fabric to put on top of the lid). Tie the ribbon around Fireball, then wrap the ribbon around the mason jar and tie a bow.
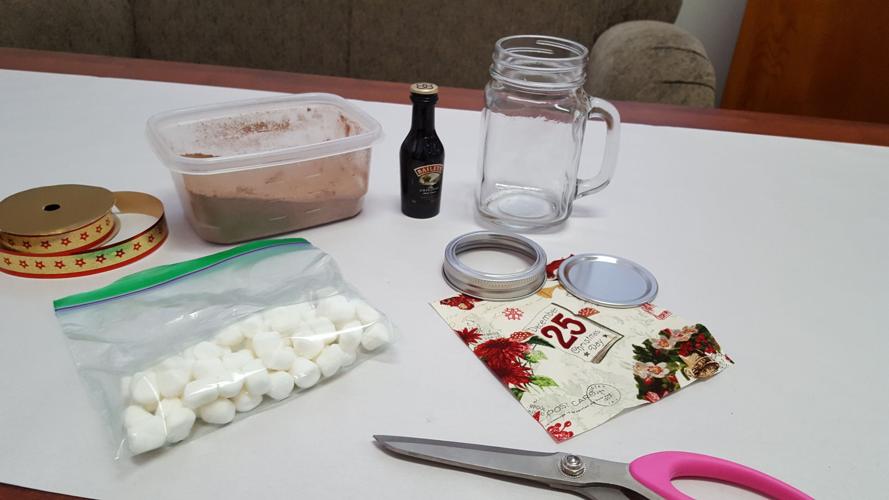
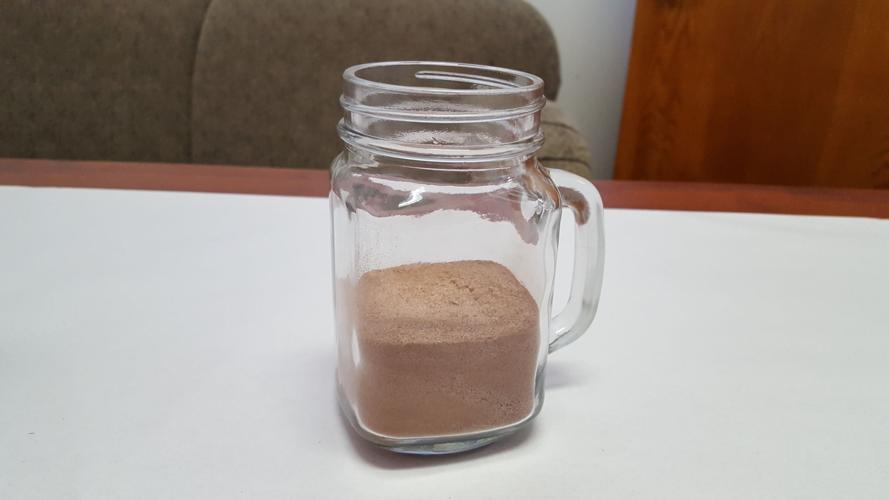
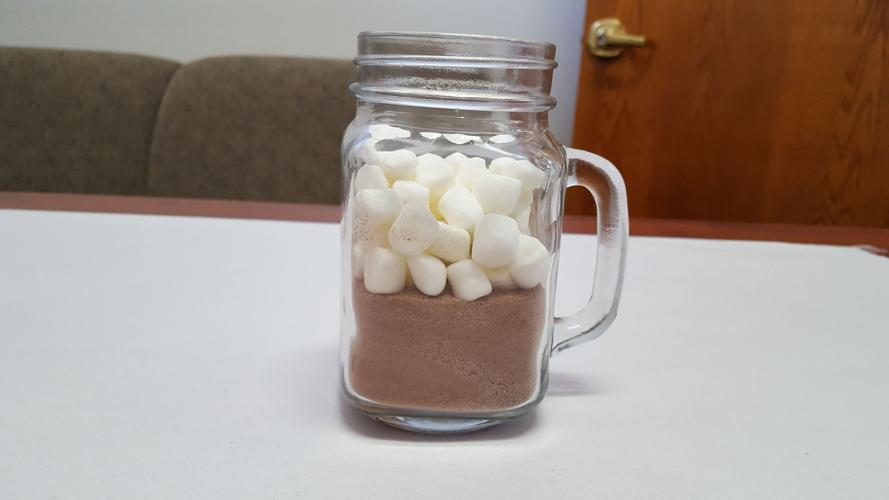
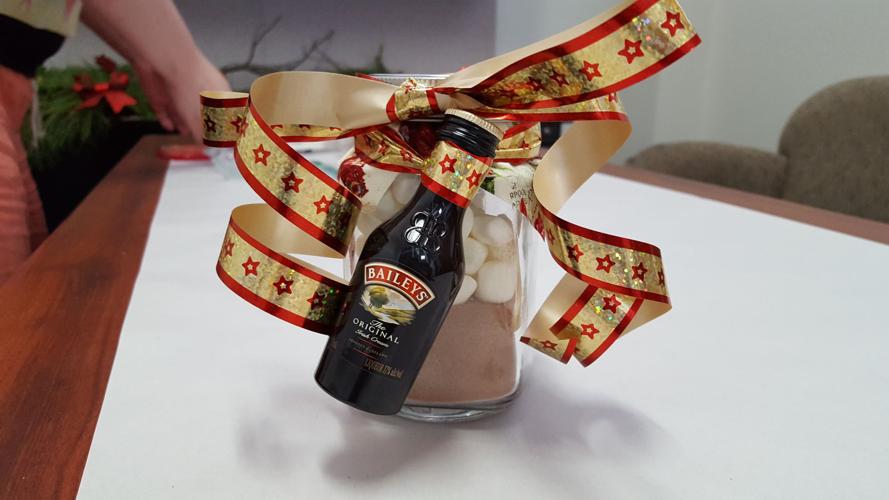
DIY gift ideas: drink in a jar: hot cocoa and Baileys
Google 'drinks in a jar' or search 'DIY drinks in a jar' on Pinterest and you will have more suggestions then you could ever use. There are so many other ideas in mason jars for gifts: for your dog loving friends you could do doggie treats in a jar, first aid kit in a jar, dinner in a jar, cookies in a jar — the list goes on and on.
What you will need:
- Hot cocoa
- Marshmallows
- Mini Baileys Irish Cream
- Mason jar with a handle and a lid
- Scissors
- Ribbon
Place desired amount of cocoa in Mason jar, add marshmallows. You can cut out a square or circle of fabric to put on top of the lid. Tie the ribbon around the mini Baileys then wrap ribbon around mason jar and tie with a bow.
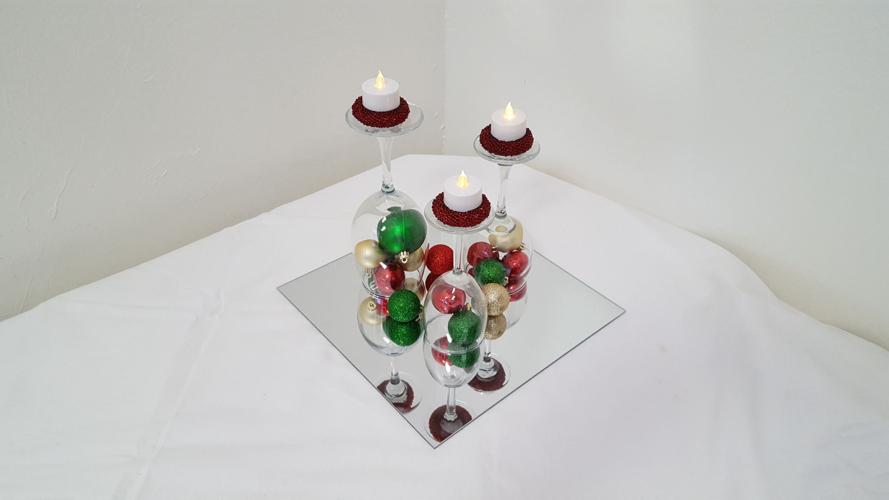
DIY holiday decorating ideas: glass ornaments in wine glasses with candles
This makes an impressive table centerpiece — or just a random holiday decoration. Use your imagination when it comes to colors and design.
What you will need:
- Mirror
- Colored ornaments
- Candles
- 3 different size wine glasses
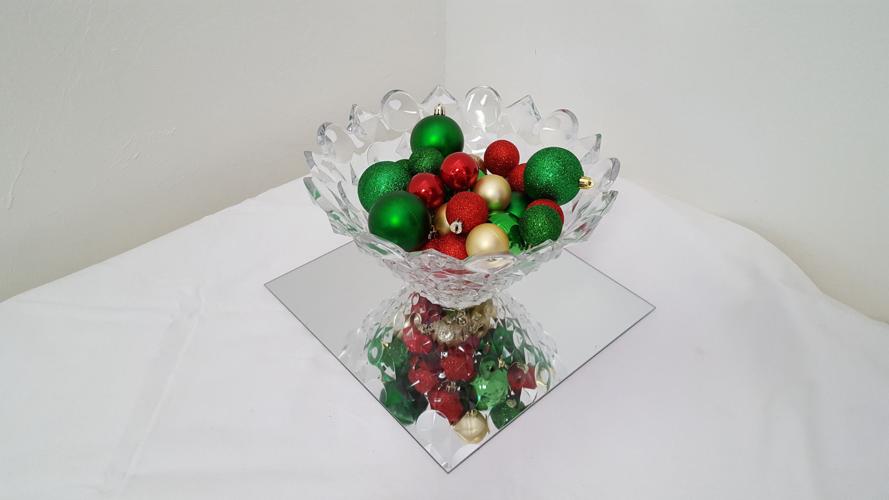
DIY decorating ideas christmas ornaments in a glass bowl
Another table decoration idea using what you are likely to have hanging around the house.
What you will need:
- Mirror
- Colored ornaments
- Glass bowl
You can use any mirror you have from around the house or you can buy a pack of mirrors at the hardware store or local Walmart. The Colored ornaments can be bought pretty much anywhere but the most inexpensive is at your local dollar store — they have a variety of colors and sizes.
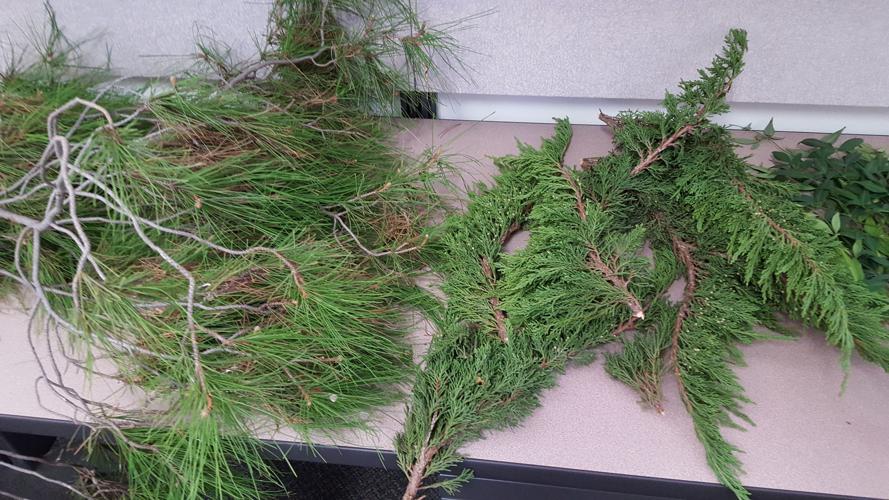
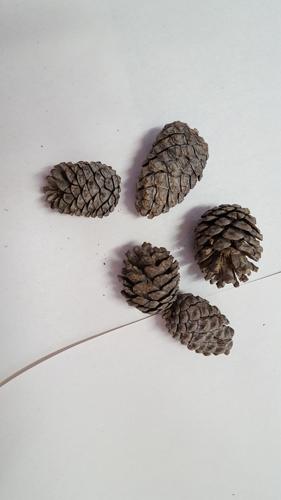
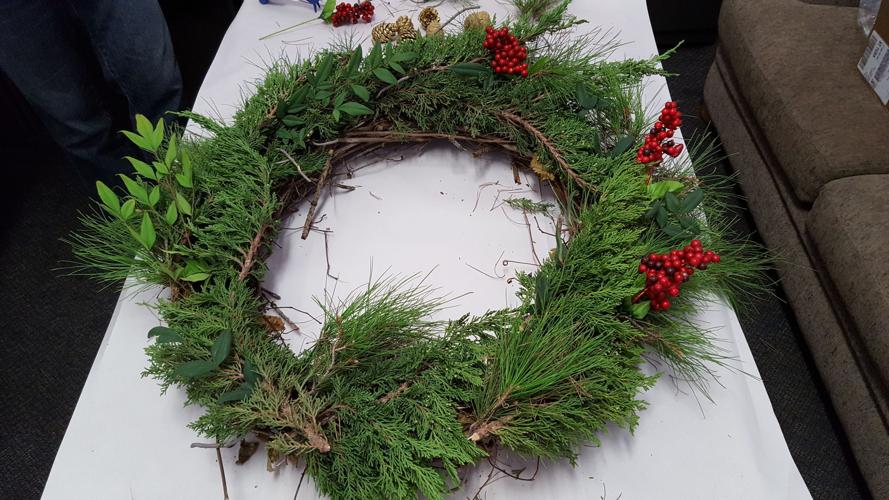
DIY holiday decorating ideas: making a wreath
Hang this on your door, give as a gift, or use as a centerpiece.
What you will need:
- Wreath base
- Foliage (pine trees, grape leaves...)
- Bows
- Pine cones
- Hot glue
- Holly berries
- Wreath hanger
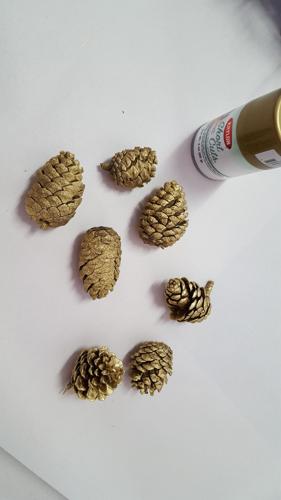
A wreath base isn't necessary, but it makes this project a little easier. If you have a pine tree in your backyard, pick up some of the pine cones that have fallen to the ground and trim a few branches off. You could go to your local craft store or florist for foliage or see what you might have in your own yard. We covered the base with the fuller foliage, gluing it on and adding a variety of leaves and branches to give the wreath some texture. Add pine cones sprayed gold, a bow and holly berries. Make sure everything is glued on tightly. You can buy a flower preserving spray to spray on the wreath to help it stay beautiful longer.
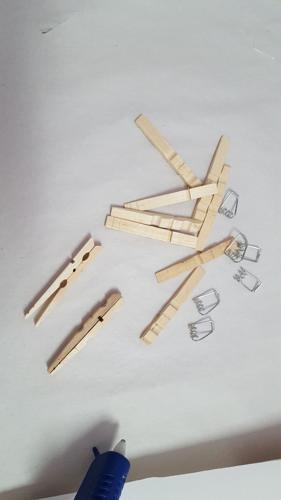
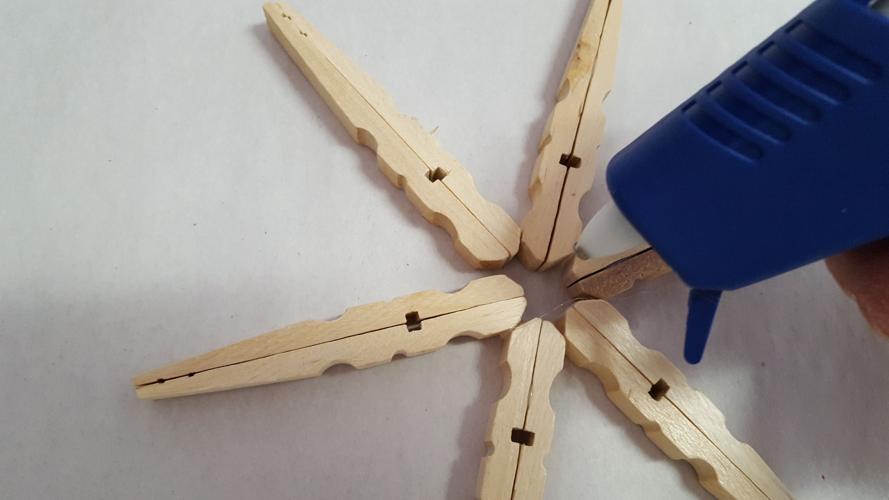
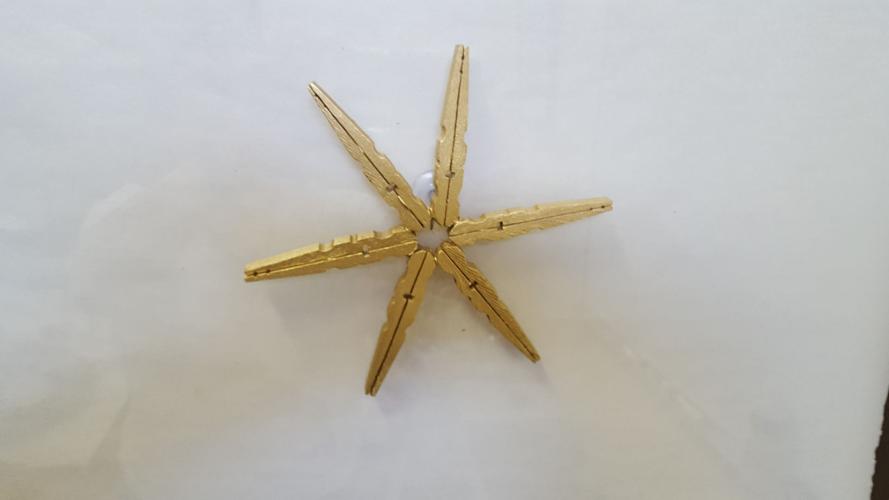
DIY holiday decorating: snowflakes
Hang a few of these in a window or on your sliding door for a festive decoration.
What you need:
- 6 clothes pins
- Glue gun
- Spray paint
- Suction hook
Remove the metal hinge from the clothes pins. Glue the two flat sides together on all six clothes pins. Glue the corners together of all six pins to create a snowflake. You can spray paint them if you like. Glue the suction hook to the back.
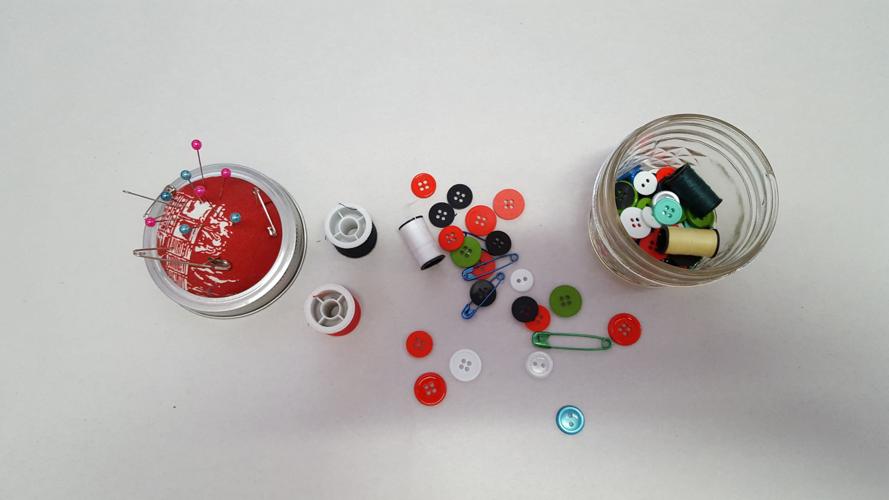
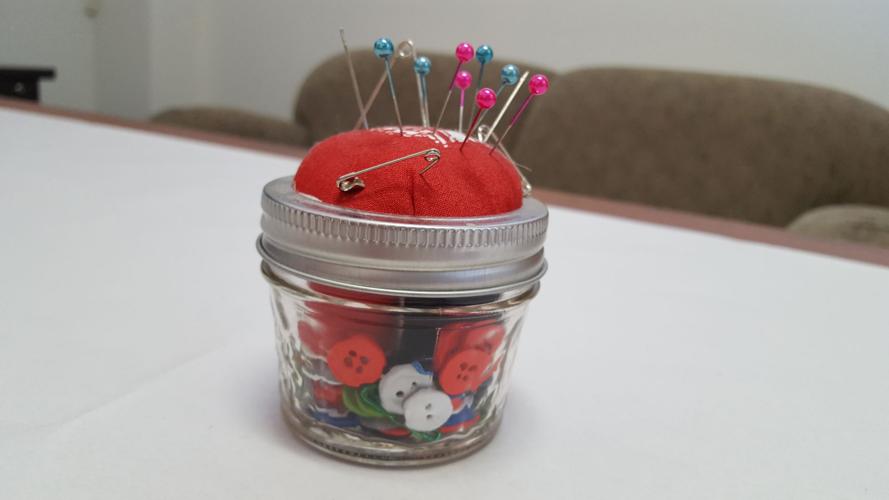
DIY Gift ideas sewing kit in a jar
Who doesn't love and need a sewing kit? This one might be nice for co-workers or friends, who can keep them in their desks or cars, making them handy for when a quick fix is necessary.
What you need:
- Small jar with lid
- Sewing supplies
- Glue gun
- Small piece of fabric
- Stuffing, such as batting or sponge
For the top, glue the fabric onto the lid leaving a small hole to fill with stuffing. Fill jar with sewing supplies and you're done.
Local DIY Classes
Here are a few local classes that might inspire your DIY efforts.
Outdoor Family Day: Natural Wreath Making
Brandi Fenton Memorial Park Visitor Center, 3482 E. River Road. Using natural materials such as: acorns, devil's claw, pine cones, herbs and more to create holiday wreaths. All ages. Register online. 2-4 p.m. Dec. 10 $5. 615-7855.
Kids Class
The Carriage House, 125 S. Arizona Ave. Interactive class making candy cane white chocolate hearts, cupcake in a mason jar and more. Kids ages 8-14. Children must be accompanied by an adult. 11 a.m.-1 p.m. Dec. 10 $40. 615-6100.
Send a Letter to Santa
Postal History Foundation, 920 N. First Ave. Write a letter to Santa or create a Christmas, Hanukkah or Kwanzaa card. Supplies provided. Bring 47 cents to mail to the North Pole. 10 a.m.-2 p.m. Dec. 8, 9, 12-16, 19-23. Free. 623-6652.
Hanukkiyah Factory and Shabbat Potluck
Tucson Jewish Community Center, 3800 E. River Road. Make a Hanukkiyah to take home for the holidays. Supplies provided. Shabbatt and Hanukkah singing. Bring a dish to share. 6-7:30 p.m. Dec. 9 $5. 299-3000.
Winter Workshops: Paper-Cut Snowflakes — Carrie Levesque helps you create snowflakes for in-house decoration. Free. 1-562-652-5306.
- Cartel, Downtown, 210 E. Broadway. 9 a.m.-noon. Dec. 10.
- Johnny Gibson's Patio, 11 S. Sixth Ave. 9 a.m.-noon. Dec. 17.
Gift Wrapping Party
Wheeler Taft Abbett Sr. Public Library, 7800 N. Schisler Drive. Tape, scissors, gift tags and a small selection of wrapping paper provided. Bring ribbons, bows or wrapping paper. 10 a.m.-4 p.m. Dec. 16. Free. 594-5200.
Miracle on Congress St.
272 E. Congress St. Visit Santa, decorate a cookie, and join the Children’s Museum Tucson for a special holiday arts and craft activity. 2:30-4:30 p.m. Dec. 10 and 17. Donations appreciated. 396-3691.
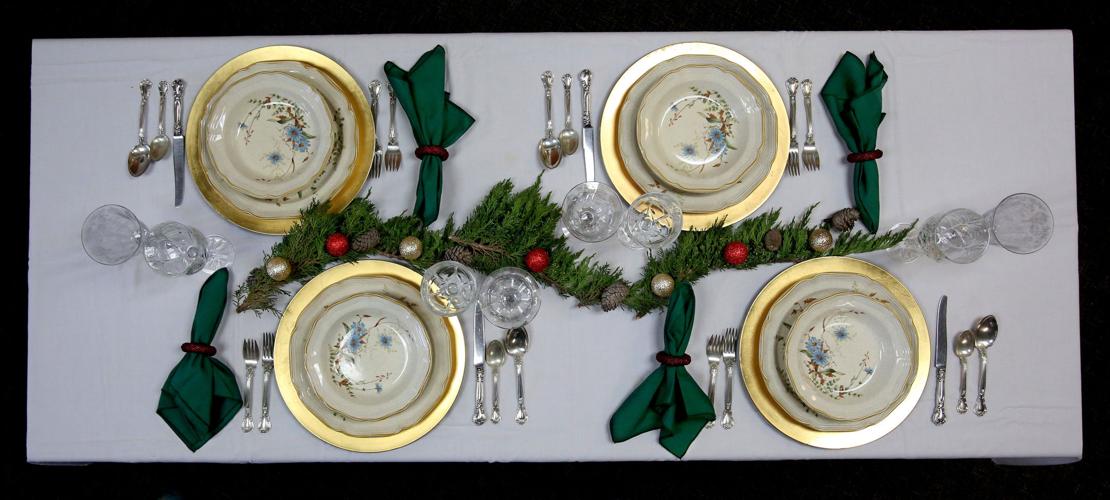
DIY holiday decorating: decorating a table
It takes so little to make a table look festive — and this idea is for a low centerpiece, allowing you to lock eyes with those across the table.
What you need:
- Table setting supplies (see our table setting suggestions)
- Evergreen shrub
- Pine cones
- Color of choice ornaments
After arranging your place settings on the dinner table, place the evergreen shrubs down the center, sporadically laying the pine cones and ornaments.
Photos and video
For photo galleries and videos of these projects go to tucson.com/diy.
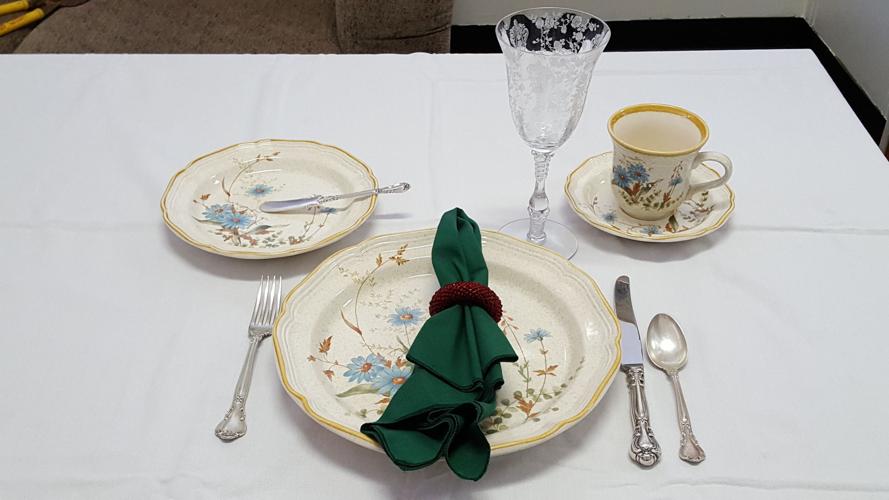
DIY Etiquitte: family table setting
There are so many variations to the family table setting so cater it to you and your families style and needs but below are the basics.
What you will need:
- Plate
- Bread plate (optional)
- Cup and saucer (optional)
- Water goblet or glass
- Fork, knife and teaspoon
- Napkin (napkin ring optional)
The basics: The fork is on the left, the plate in the center, and the knife on the right with the blade facing the plate. The spoon goes to the right of the knife. If using a bread and butter plate, it goes above the fork with the butter knife on the plate, handle to the right. Drinks go above the knife and spoon with the water glass to the left of the coffee cup, if used. The napkin can be placed to the left of the fork or on the plate.
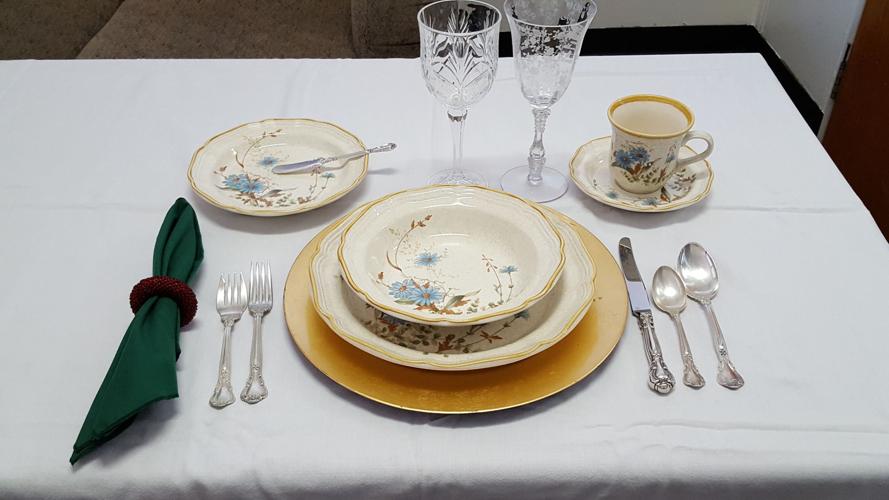
DIY etiquette formal table setting
There are so many variations to the formal table setting so cater it to your needs and the meal you have planned.
What you will need:
- Plate
- Soup bowl
- Bread plate
- Cup and saucer
- Water goblet or glass, wine glass
- Fork, knife and teaspoon, soup spoon, salad fork
- Napkin
- Charger
Follow the instructions for the family table setting but add the salad fork to the left of the dinner fork, add the soup spoon to the right of the teaspoon, add a wine glass to the water glass — just keep going left with the glasses. The napkin can be folded under the soup bowl or to the left of the salad fork. Remember, you can make any adjustments as needed, according to space, preference and what you have.
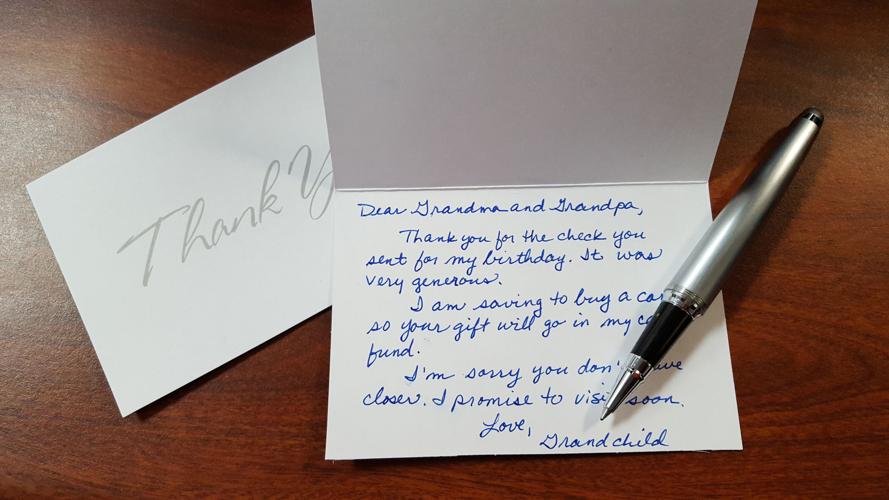
DIY etiquette Thank you note
This is a classic way to show your appreciation for a gift or an event or really anything you are thankful for. A note of thanks is especially important when you are given a gift from an older-than-you family member. Times are changing so e-mail, text and Facebook messages are acceptable on some occasions. Events where a mailed thank you note are necessary are for events like wedding gifts, shower gifts and the such. Remember, make it personal, mention the gift, and what you might do with it ("Grandma, thanks so much for the check. I can't wait to buy a new baseball bat. I love you. Buddy.")
What you will need:
- Thank you card and envelope
- Pen — black or blue ink makes the note more legible
- Stamp
Subscribe to stay connected to Tucson. A subscription helps you access more of the local stories that keep you connected to the community.
Be the first to know
Get local news delivered to your inbox!

Sara Brown
Opinion Coordinator


