

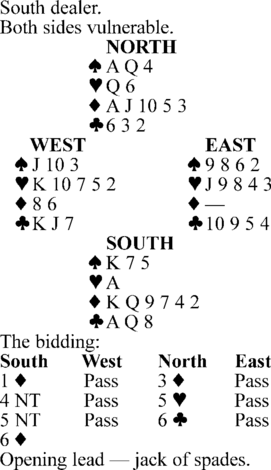
How would you play this hand at six diamonds to give yourself the best chance for the contract?
The actual South won the spade lead with the king and drew two rounds of trumps. After cashing the heart ace, he crossed to the spade queen and ruffed the queen of hearts. Declarer then led a spade to dummy's ace and returned a club.
He was planning to play the eight if East followed low. This would force West to win and return a club into the A-Q or yield a ruff-and-discard, either of which would hand South the contract.
But East, having carefully observed declarer's maneuvers up to this point, threw a monkey wrench into the works by playing his nine on the club lead from dummy. Now, whether South played the queen or followed low, a club continuation by would sink the slam.
Actually, declarer was on the right track, but he neglected to take advantage of an additional chance to make the slam. After drawing trumps and playing the heart ace, he should have cashed both the ace and queen of spades before leading the queen of hearts from dummy.
People are also reading…
If East has the king and covers the queen, South can ruff, re-enter dummy with a trump and proceed as before. But if East does not produce the king, declarer does not trump. In stead, he discards the eight of clubs, forcing West to win the trick and hand South the contract.
The 50-50 chance that West has the heart king is much too important a possibility to ignore. Nothing can be lost by exploiting this extra chance. If West has the king, the slam is assured. If East has it, no harm has been done.


